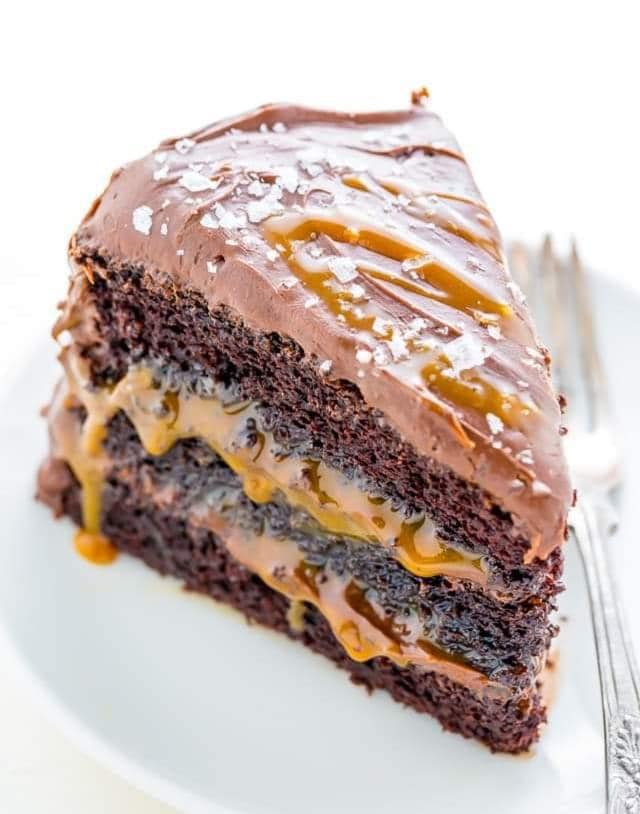
Three layers of Salted Caramel Chocolate Cake slathered in homemade Chocolate Frosting. So decadent!
Salted caramel chocolate is a decadent and indulgent treat that beautifully combines the rich, velvety flavors of chocolate with the sweet, buttery goodness of caramel,
all enhanced by a touch of sea salt. This delightful confection has gained immense popularity in recent years, becoming a favorite among dessert lovers and chocolate enthusiasts alike.
The harmonious balance of sweet and salty, along with the luxurious textures, makes salted caramel chocolate a truly irresistible dessert experience.
The foundation of salted caramel chocolate begins with the creation of the caramel itself. Traditional caramel is made by melting sugar until it reaches a deep amber color, a process known as caramelization.
This transformation occurs when the sugar molecules break down and re-form, resulting in a rich, complex flavor. Once the sugar has melted, heavy cream and butter are added to create a smooth, creamy consistency.
The combination of cream and butter not only adds richness but also helps to temper the sweetness of the caramel, creating a well-rounded flavor profile.
To achieve the perfect salted caramel, a pinch of sea salt is added to the caramel mixture. The salt enhances the sweetness of the caramel while providing a delightful contrast that elevates the overall flavor.
The choice of salt is crucial; flaky sea salt, such as Maldon or fleur de sel, is often preferred for its delicate texture and ability to dissolve beautifully in the caramel. The result is a luscious salted caramel that is both sweet and savory, making it a perfect complement to chocolate.
Once the salted caramel is prepared, the next step is to incorporate it into the chocolate. High-quality chocolate is essential for creating a truly indulgent treat. Dark chocolate,
milk chocolate, or even white chocolate can be used, depending on personal preference. Dark chocolate, with its rich cocoa content, pairs exceptionally well with the sweetness of the caramel, while milk chocolate offers a creamier, sweeter flavor. White chocolate, on the other hand, provides a unique contrast with its buttery sweetness.
The chocolate is typically melted and tempered to achieve a smooth, glossy finish. Tempering chocolate involves carefully heating and cooling it to stabilize the cocoa butter crystals,
resulting in a chocolate that has a beautiful sheen and a satisfying snap when broken. Once the chocolate is tempered, it can be poured over the salted caramel or used to create chocolate shells for filled confections.
One popular way to enjoy salted caramel chocolate is in the form of chocolate bars or bonbons. For chocolate bars, a layer of salted caramel is spread over a base of chocolate,
then topped with another layer of chocolate to create a deliciously layered treat. The bars can be cut into squares and sprinkled with additional sea salt for an extra touch of flavor and visual appeal.
For filled chocolates, the tempered chocolate is poured into molds to create a shell. Once the chocolate has set, a generous spoonful of salted caramel is added to each mold,
followed by a final layer of chocolate to seal in the caramel. These bite-sized treats are then chilled until firm, resulting in a delightful explosion of flavors and textures with each bite.
Salted caramel chocolate can also be used in a variety of desserts, such as cakes, brownies, and cookies. A salted caramel chocolate cake might feature layers of rich chocolate cake filled with salted caramel frosting, while brownies can be swirled with salted caramel for a gooey,
indulgent treat. Cookies can be stuffed with salted caramel and chocolate chunks, creating a delightful combination of flavors in every bite.
In addition to its delicious taste, salted caramel chocolate is often associated with feelings of comfort and indulgence. The combination of sweet and salty flavors evokes a sense of nostalgia, reminiscent of childhood treats and special occasions.
Whether enjoyed as a simple chocolate bar, a luxurious dessert, or a special gift for loved ones, salted caramel chocolate is sure to bring joy and satisfaction.
In summary, salted caramel chocolate is a luxurious and indulgent treat that combines the rich flavors of chocolate with the sweet, buttery goodness of salted caramel. The harmonious balance of sweet and salty, along with the smooth textures,
makes it a favorite among dessert lovers. Whether enjoyed in the form of chocolate bars, filled confections, or decadent desserts, salted caramel chocolate is a delightful experience that is sure to satisfy any sweet tooth and elevate any occasion.
Ingredients
For the chocolate cake:
- 2 cups granulated sugar
- 1 cup light brown sugar, packed
- 2 and 3/4 cups all-purpose flour (not packed!)
- 1 and 1/2 cups unsweetened cocoa powder, sifted
- 3 teaspoons baking soda
- 1 and 1/2 teaspoons baking powder
- 1 and 1/4 teaspoons salt
- 3 large eggs + 2 large egg yolks, at room temperature
- 1 and 1/2 cups full-fat sour cream
- 1/3 cup whole milk
- 3/4 cup vegetable oil (you may also sub in melted coconut oil)
- 2 tablespoons vanilla extract
- 1 and 1/2 cups hot water
- For the salted caramel chocolate frosting:
- 2 cups unsalted butter (4 sticks, 16 ounces), VERY soft
- 4 and 1/2 cups confectioners’ sugar, sifted
- 3/4 cup unsweetened cocoa powder, sifted
- 1 teaspoon vanilla extract
- 1/2 teaspoon salt
- 3 tablespoons heavy cream (more if needed)
- 2 tablespoons salted caramel sauce
Garnish:
- 1 and 1/4 cups salted caramel sauce
- Flaky sea salt
Instructions
For the chocolate cake:
Preheat oven to 350°(F). Cut out three 9-inch round segments of parchment paper to line your cake pans with. Spray each pan generously – sides and bottom – with nonstick cooking spray, then place the parchment paper cut out in the bottom of the pans and spray again. It’s important to make sure every bit of pan and paper are sprayed so your cakes don’t get stuck. Set pans aside.
In the bowl of a stand mixer fitted with the paddle attachment, or in a large bowl using a handheld electric mixer, combine both sugars, flour, cocoa powder, baking soda, baking powder and salt; mix on low until dry ingredients are thoroughly combined. Use your hands to break up any large clumps, if needed.
In a separate bowl combine the eggs, egg yolks, sour cream, milk, oil and vanilla extract; mix until completely combined. Pour mixture into the dry ingredients and beat on low until just incorporated. Pour in hot water and continue mixing until completely combined; about 1 minute. The batter will quite thin.
Divide batter evenly among prepared pans. Bake in preheated oven for 30 minutes, or until a wooden toothpick or cake tester inserted in the center of a cake comes out clean or with just a few moist crumbs attached. Cool cakes for 10 minutes in the pan before removing from pans and transferring to a cooling rack; cool cakes completely before frosting.
For the chocolate frosting:
In a stand mixer fitted with the paddle attachment, cream the softened butter on medium-speed until completely smooth; about 3 minutes.
Turn the mixer off and sift the powdered sugar and cocoa into the mixing bowl. Turn the mixer on the lowest speed and mix until the sugar/cocoa have been absorbed by the butter; about 2 minutes. Increase mixer speed to medium; add in vanilla extract, salt, heavy cream and salted caramel; beat for 3 minutes. If your frosting appears a little too thin, add a little more confectioners’ sugar; If your frosting needs to be thinner, add additional heavy cream, 1 tablespoon at a time.
Assembly:
Using a serrated knife, carefully trim the raised top of each cake, making each one an even, level surface. Transfer 1 layer to a large plate or cake stand. Spread a thin layer of frosting on top, then add a 1/2 cup of caramel; top with another cake layer, and repeat, thinly spread it with a layer of frosting, then adding a 1/2 cup of caramel. Top final cake layer and place cake in the fridge to set for 1 hour. Once set, finishing frosting the top and sides of the cake. Sprinkle with sea salt. Slice and serve, or keep refrigerated for up to 5 days.
NOTES
Cake may be baked up to 5 days in advance and stored in the fridge. Unfrosted cakes may be wrapped and frozen for up to 2 months. For best results, follow the recipe as written.